Tuesday, January 24, 2012

A Work In Progress

I have to start this post by bursting my own bubble.  The beautiful LC Frank Shadle that I bragged was so temperature tolerant, finally succumbed to the nightly lows.  It got even colder the night after that post, and when I came out in the morning, the beautiful flowers of the day before had turned to wet tissue paper!
LaelioCattleya Frank Shadle - wilted
©2012 MadOrchidist.com
I had been trying to do little things to keep the frost at bay, like stringing some old holiday lights around the orchid zone at night for a little extra heat:
X-mas lights weren't enough
©2012 MadOrchidist.com

No quick fix is going to secure the future of my collection, so I finally broke down and decided I need a greenhouse.  Being on a tight budget, and not wanting to rack up a large bill heating, I opted for a small kit from Harbor Freight Tools.  I know this isn't the highest quality around, but the price was right for my first foray into more serious climate control.

Harbor Freight GreenHouse Kit
©2012 MadOrchidist.com
So, I have to turn this pile of aluminum into an orchid paradise:
Harbor Freight Greenhouse Parts
©2012 MadOrchidist.com
One of the drawbacks of this small kit is it's height.  I am a fairly tall guy, and the door frame is at about my eye level.  I opted to cobble together a row of cinderblocks and a pressure-treated 4x4 sill to raise the kit up off the ground a bit.  I will have to step over the sill to enter, but at least I won't hit my head!

Nitrile gloves are't just for the lab!
©2012 MadOrchidist.com
 I had some help for the first phase of construction; thanks Dave!!  Here I am admiring the empty frame, partially built:
Phase one of greenhouse frame construction
©2012 MadOrchidist.com
The next step is to get the double-walled polycarbonate panels installed and secured.  It gets windy here, so I will have to go above and beyond the manufacturer's recommendations.

Once that is done, I will chase the spiders out of my breaker panel and add a circuit for some outdoor outlets:

A space just asking for a new outdoor circuit
©2012 MadOrchidist.com

This is all very timely, since I have identified a new direction in collecting and breeding that interests me, and some of the plants I have my eye on are not all that temperature tolerant.  More on that to come!


Tuesday, January 17, 2012

Safety In Numbers

This post is mostly about contamination, but I figured I had better start out with a picture of a beautiful orchid, lest I scare away any readers:
LaelioCattleya Frank Shadle
©2012 MadOrchidist.com
This is LC Franks Shadle, happily blooming away in (what I consider) frigid conditions outside right now (I am pretty sure it hit freezing last night).  This kind of temperature tolerance should definitely be selected for, and I have already pollinated the flower (as if there would be any question).

Anyway, on to the real issue at hand.  A little while ago, I had a marathon session in the glovebox flasking up some seeds I ordered on eBay.  I opted to make two flasks of each species as insurance against contamination.

Contaminated Flask
©2012 MadOrchidist.com
It is a cruel irony of orchid culture that if something goes wrong, you will probably find the unpleasant result very quickly, but if something goes right, it may take months (or years) on end to reward you.  Such is the case here.

Ascocentrum and Gastrochilus flasks contaminated
©2012 MadOrchidist.com
Two of the 8 total flasks in this group have grown a white fluffy fungus - one Gastrochilus bellinus and one Ascocentrum ampullaceum.  These are the two in which I was most interested, so I am glad to have a backup flask of each that appears uncontaminated.  Really, the fact that some flasks have turned up contaminated means I can probably breathe easy about those remaining.  After more than 2 weeks, none of this cohort has yet shown any signs of germination, but as with all things orchid, it could take a while . . .

So, having sown seeds in 18 mother flasks thus far in my laboratory career, two of them have grown something rather unpleasant.  That is a contamination rate of about 0.11 -- improvable, but also acceptable to me at this stage.

Of the remaining seed flasks, three Epidendrums have begun growing, and everything else shows no sign of life - either desirable or undesirable.  More waiting.

I have long been growing Orchids for their beautiful flowers, so I understand the waiting game, but there is a trick for the impatient like me.  If you have enough plants, the likelihood that something will be blooming at any given moment increases dramatically.  I remember becoming aware, several years ago, that I had reached this "critical mass" of Orchids.  My off the cuff estimate is that once you reach a couple of hundred different plants (provided they are of a variety of varieties), you can pretty much count on having at least something blooming all the time.

The Mad Orchidist in his natural habitat
I think that the same phenomenon will eventually kick in with my laboratory operation.  Right now, because I have a modest number of flasks and seed pods going, it sometimes seems as if nothing is happening.  If this adventure picks up momentum, which I hope it will, then at some point in the no-so-distant future it will seem that there is always something interesting going on.  Safety, and excitement, in numbers!

Friday, January 6, 2012

A Flask 6 Months in the Making

Back in July 2011 I attempted my first orchid pollination.  Since then I have been pollinating other flowers and learning/testing laboratory flasking procedures with seeds obtained elsewhere.  Now the seed capsule resulting from that first pollination attempt is mature, and it is finally time to put the lab to use with my own seeds!

Ripe Seed Pod with Coffee Filter Safety Net
©2012 MadOrchidist.com
I brought the pod-parent plant inside recently so that I could keep an eye on the ripening pod.  I have been propping a clean coffee filter under it to catch seeds in case it should burst when I'm not looking.  Well, today I caught it in the act.  I walked into my office and noticed that the end had suddenly turned yellow; closer examination revealed that it had begun to split open.  Time to harvest those seeds!

Dried LC Schilleriana Orchid, Cut From Ripe Seed Pod
©2012 MadOrchidist.com
Above is a photo of what's left of the original flower I pollinated - I'd say it's a bit less attractive now than it was nearly 6 months ago.  I snipped the pod from the plant and cut away the stem and dried flower remnant.

Preparing the Pod for Seed Harvesting
©2012 MadOrchidist.com
Since the capsule had only just begun to dehisce (dry and open), I helped it along a bit with a scalpel.  Here is what it looks like split open:
Splitting an Orchid Seed Pod
©2012 MadOrchidist.com

Since I didn't do anything new with cleaning and flasking the seeds, and all my glove-box photos look pretty much alike, I'll leave that part out of this post.  Instead, here are some more photos of the seeds to give a sense of scale to both their size (very small) and number (very large).

 Here is a low-power micrograph of the seeds still in a section of the capsule:
Orchid Seed Micrograph
©2012 MadOrchidist.com
 You can see some individually along the edge, but in the middle it is just a dense fluff of innumerable seeds.  I tapped and scraped out a bunch onto a clean sheet of white printer paper.  There are more seeds there than I could ever possibly need or want!  I sowed a portion of them into 4 mother flasks tonight and put a bunch more into cold storage.  That way, if these flasks become contaminated, I can try it again.

Thousands and Thousands . . . and Thousands of seeds
©2012 MadOrchidist.com
Below is my favorite picture of the day.  That is the razor sharp edge of a surgical scalpel, and each of those white flecks is a tiny seed!
Tiny Tiny Seeds on a Scalpel
©2012 MadOrchidist.com
It's one thing to know that Orchids have very small seeds; it's another entirely to look through the 'scope and really "feel" how small they are - or exhale while opening the capsule and see a cloud of them rise into the air . . . both experiences I feel richer for having had.

With my limited magnification power and light sources, it's hard to determine if there are viable embryos in there.  I didn't see anything that positively confirmed viability, but that doesn't necessarily rule it out either.  Time will tell . . .

Thursday, January 5, 2012

Little Victories

Progress!  The tiny green dots in the blurry photo below are actually what this blog madness is all about:

Epidendrum Orchid Protocorms In Vitro
©2012 MadOrchidist.com
These Epidendrum seeds have germinated; at this stage, the little green balls of undifferentiated and dividing cells are called protocorms.  Most importantly, there are no obvious signs of contamination! All three of the flasks I made up with these seeds (dry and then sterilized) are looking good; here is another one:

Succesful Orchid Germination
©2012 MadOrchidist.com
In this case, the orchids themselves (reed-stem Epidendrums with no ID) aren't that exciting, but that fact that I was able to sterilize, flask, and germinate them successfully at home is.  In fact, of the more than a dozen mother flasks I have sown with various seeds so far, none are showing any contamination (yet) - a good sign that my home-grown laboratory and procedures are viable.

Further progress toward my eventual goal of actually breeding my own new orchids is also being made.  Today I noticed that the seed capsule of the first cross I made back in July 2011 has matured.  It is turning yellow and has just begun to split at the end where the flower was.  This eliminates any chance of sowing these with the "green pod" method, since I must presume the seeds are contaminated now that they have been exposed to the outside world.  I will definitely get on to flasking them up soon.

LaleoCattleya Seed Capsule Maturing
©2012 MadOrchidist.com
These will hopefully be the fist new orchids that are completely my own, from pollination to germination.  This was just the shot of encouragement I needed to stay excited about this orchid odyssey . . . 

Sunday, January 1, 2012

New Year's Flasking

Happy New Year!  2011 was the beginning of a new chapter in my orchid hobby, and I am looking forward to continuing the madness in 2012.  I started off right, with some ambitious orchid seed flasking.

A while back I ordered dry seeds of a few orchid species from Thailand on eBay.  They arrived in tidy little packets, and I popped them in the refrigerator for safe keeping until I could get around to them.  I actually only ordered the first two in the picture below; the seller threw in a couple of others.  What a nice surprise!

Gastrochilus bellinusAscocentrum ampullaceum,Dendrobium pachyphyllum, and Gastrochilus patinatus
©2012 MadOrchidist.com
Here's an open packet showing the bright yellow seeds of Dendrobium pachyphyllum:
Dendrobium pachyphyllum Seeds
©2012 MadOrchidist.com
And here are is a closeup of some of the Ascocentrum seeds using my iPhone and an antique dissecting microscope - what a cool combo!  If you look closely, you can see the fibers of the white printer paper to give you a sense of how small they are:
Ascocentrum ampullaceum seeds magnified under my stereo dissecting scope
©2012 MadOrchidist.com

I got a little ambitious and decided that I would try to sow all four species in one flasking session in the glove box.

Orderly Preparation - don't want to mix them up!
©2012 MadOrchidist.com
After numbering and labeling syringes to correspond to the right species and flasks, I got to sterilizing the seeds. 

Orchid Seed Solution
©2012 MadOrchidist.com

Since my first attempt hasn't yet shown any contamination, I used the same procedure for these seeds.  The biggest difference is that I did four syringes instead of one, and I only used the "filter" cap I made on one of them.  The others I just let settle a bit longer after every rinse to avoid squirting out too many seeds.

Once more into the box
©2012 MadOrchidist.com
Four at once turned out to be a bit more than was comfortable.  It required me to have a lot more stuff in the glove box (multiply empty flasks and sterile water jars by four), and the possibility for cross-contamination or a mix-up seemed high.

Crowded and Messy in the glove box
©2012 MadOrchidist.com
Finally, mother flasks of the four species are sealed and out of the box.  This took a while, and it made me realize how non-ergonomic my glove box is.  I have to hunch over it to get the best view through the acrylic window on top while working, and it gets to my neck eventually.

New Orchid Flasks
©2012 MadOrchidist.com
The whitish particles below are a thin layer of seeds and water in a finished flask.

Orchid seeds in vitro
©2012 MadOrchidist.com

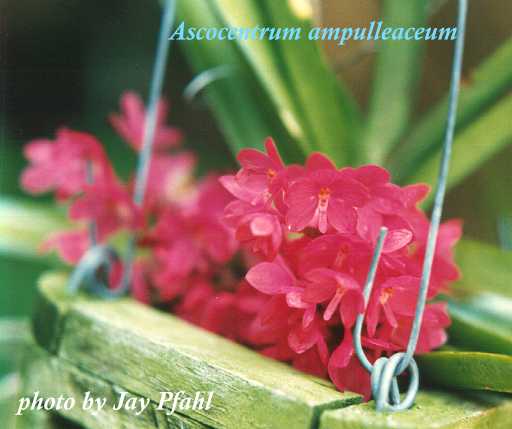
Here are some representative photos of these species from the Internet Orchid Species Photo Encyclopedia (click on the name below a photo for more info).

Gastrochilus patinatus

Ascocentrum ampullaceum

Dendrobium pachyphyllum
Gastrochilus bellinus